With the temperature finally getting to be somewhat uncomfortable, we decided to turn on the units, but when they stopped blowing cool air after a few hours of use, we called our HVAC guys, who said that the first thing we needed to do was convert our thermostats from the old-school mercury ones to digital ones. He said that since the mercury readers are original to the installation, they are likely not calibrated correctly anymore and are reading the temperatures of the house and the units incorrectly. Replacing them will give us a better understanding of the temperature that we are asking the air conditioners to cool to.
He suggested a retailer, and we stopped by to pick up some new thermostats. The way that our house is setup is that there are four different heat zones and two air conditioning zones. Following the recommendation by the retailer, we decided to get two digital 7-day programmable thermostats and two regular digital thermostats.
Installation was so easy, which is the real reason I am writing this post. If you have digital thermostats that need to be installed, do it yourself. Save yourself the extra money that hiring a contractor or electrician would cost. Just follow the simple steps below and you'll be golden!
The first step is to turn off the electricity to the thermostats. If your electrical panel isn't labeled specifically for the thermostats, turn off all the power to that room or floor just to be safe. The last thing I want is for you to follow these directions and then get shocked by the electrical!
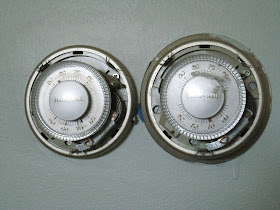
Next, remove the existing thermostats. I have one heat and one air conditioning thermostat, which will be combined into one new programmable one. These are what mine looked like:
They are old, gold, and ugly. Please also ignore the absolutely terrible paint job that was done previously in my house. Seriously, I hope that this was just a DIY gone wrong because this entire house's paint is absolutely awful, and if it was actually done by a professional, it's pathetic. Aside from the drips and the fact that they didn't remove any light switches or anything to paint, I keep finding blue painter's tape everywhere, and as you can see, even here, in between the two units!
Anyways, to remove these units from the wall, remove the cover plate to expose the screws that attach it to the base plate.
Remove all of the slotted screws. My units had three screws each. These should be the ones that are set in the plastic casing a little further and not the ones that look like they touch wires. In the picture below, you will see the slotted screw slightly underneath the square peg one. Remove the slotted one and the other two that will be closer to the bottom of the unit.
Once you have the screws out, gently pull on the unit to detach it from the base plate. Be very careful with the unit, as you don't want the glass bubble to break and the mercury to release. Mercury is very dangerous, so be careful and place the removed thermostat in a space that is safe from being knocked or pushed around.
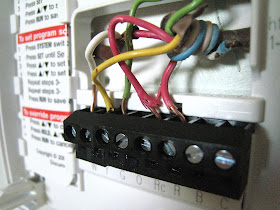
Using a smaller phillips head screwdriver, gently undo the screws that are holding the wiring in place. For your heating system, you will likely only have a red and a white wire, and for the cooling system, you will probably have a green, red, and yellow wire. If any of the wires in your cooling system are white, look for any G, R, or Y labels on the old thermostats. If the systems are really old, sometimes white wires are actually supposed to be colored, so the old thermostat will help you determine what white cable is supposed to be either green, red, or yellow.
Once your wires are undone, remove the rest of the screws that mount the back plates to the walls.
If you have more than one system that you are going to be adding to the new thermostat, you will need to pull a little extra slack out from the wall to make sure that your wires will meet in the middle, where the new thermostat will be mounted to the wall.
Hold the back plate of your new thermostat up against the wall and figure out where you want it to be placed. Make sure that the wires will reach through the center space with enough slack for you to attach them to the electrical component of the thermostat. Make placement marks in the screw spots of the back plate.
Using a drill, drill in your pilot holes according to the size of the mounting screws that came with your thermostat. I used a 3/16" bit. Hammer in your plastic anchors when the pilot holes are made.
After running your wires through the center space, attach your back plate to the wall. Make sure it is level before tightening the screws completely.
The next step is to attach your wires to the back plate of the thermostat.
Match the color of the wire up with the letter underneath the clamp. Holding the wire in place and down into the hole as far as possible, gently tighten the screw on the outside to clamp the wire into place.
Once you have all the wires in their correct spots, make sure that none of the metal parts are touching, then push the extra length into the cutout that you fed the wires through. If some of the wire parts are touching, you may need to shorten the length of the wire so that the covering is closer to the clamp.
Once you have the wires in place, insert the backup batteries into the back side of the faceplate of the thermostat. Flip the switch at the bottom to tell the system what kind of heat source you use - either gas/oil or electric/heat pump.
Clip the faceplate onto the back plate of the thermostat. Turn the power back on and then follow the directions that came with the thermostat to program it specifically for your home's heating and air conditioning systems. Also, don't forget to set your 7-day programs.
And just like that, your work is finished! If you are hesitating on whether or not to install the digital thermostats, don't. If they are your electric or gas provider, National Grid offers a rebate for each digital programmable thermostat that you purchase, so you will immediately see your money's worth with the upgrade. Plus, I'm sure that the older units on your walls aren't very attractive anymore, so this can also be a cosmetic upgrade too!
Now that I have replaced all of the units, I can't wait to paint! Hopefully this will put me in gear and I can get some painting done soon! Just do your future homeowners happy and when painting, remove all the light switches AND thermostats before painting!


That's so nice! I really love the way you do it and wish to recommend you a pretty service for essay writing and homework! If you necessity some help, do not be shy and write is academized legit online and be prepared for help! Excellent luck and have fun, guys!
ReplyDelete