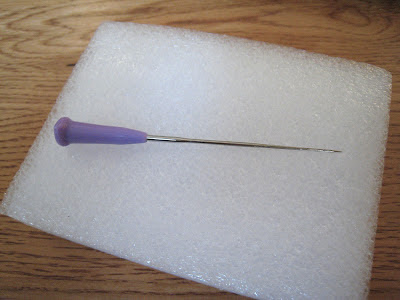
I haven't quite finished up my next house project yet, so in the meantime, let me show you this quick little thing called needle felting. Needle felting is using wood roving and a special needle for felting to pack the roving into a specific design or shape either on top of a piece of fabric, or on its own.
You may have seen wool roving made into felting balls on home decor websites or on Pinterest, and this is just an alternative design using the same tools. For me, I wanted to use this technique to try to repair my favorite sweater.
I bought my Chelsea sweater from New York and Company almost three years ago. Since having a black sweater is essential to any woman's wardrobe, mine has gotten a lot of use. So much, in fact, that I have worn a hole in each elbow. Made of acrylic, this sweater is soft and the wool matches well enough that I don't think that the repairs are noticeable unless they are pointed out.
To fix the holes in the sweater arms, I first picked up a needle felting starter kit from Hobby Lobby, which comes with two felting needles and a foam block. I also picked up a package of wool roving, and mine came with both white and black.
The felting needle isn't like a typical sewing needle. There are small cutouts at the tip, which helps the roving to grab onto the needle and be pressed into the fabric and the foam block.
To start, place the foam block underneath the part of the fabric that you wish to attach the roving to. For me, I put the block in the sleeve of my sweater, making sure that the hole I wanted to cover was in the center of the block.
Take the wool roving out of your package and unravel it gently. It should be tightly rolled and folded, so make sure that you don't rip it apart when unraveling it.
Once you have found the end of your roving, gently pull apart a piece that will generously fit over your hole, and thick enough that you cannot see through it.
Place the piece of roving over your hole, and then using your felting needle, start pressing the wool into your fabric and the foam block. Make sure that your needle is entering and exiting the fabric and block in an up and down motion, and not at an angle, as the tip of the needle can break off.
Be very careful when you are felting, because the needle is very sharp. Keep your fingers out of the way, because I know from experience that being stabbed with this needle is painful....
And yes, that did go all the way through the side of my finger and was bleeding from both ends.
Continue the up and down motion until you have made a circle around the hole in your fabric. This will make sure that you have attached the roving around the hole and secured it in place so it doesn't move off from the hole.
With short and quick motions, felt the roving into the fabric, making sure that each insert of the needle is as close to the next as possible. Repeat this motion until you have pushed all of the roving into the fabric, including where the hole was.
Once your roving has been pushed into the fabric and foam block, you can gently remove the block from the other side of your fabric. You may need to gently pull some of the roving out of the block.
Below, you can see the difference in the foam block before and after felting. Prior to felting, the foam block was firm, with very little of my finger able to push into the block. After, you can see that there is a significant indentation made by my finger, and that there is some wool roving sticking out of the foam block.
Once you are finished and have removed the foam block from your fabric, your work is complete. You will now have a patched hole in your fabric.
While the two pictures below are of different elbows, the holes were almost identical, one being slightly larger than the other. The picture that you see first is of the hole in the elbow of my sweater while it is being worn. I know it's slightly awkward - elbows are weird! The second picture is of the patched hole using the wool roving. You will notice the patching because I purposely took the picture very close to my arm, but from further away than six inches, it is much less noticeable.
And just like that, I can wear my favorite sweater again, and hopefully, this will last me another three years of wear!
Have you ever felted before? What have you done to repair a hole in your sweater?


1 comment:
Thank you! This is what I need to do to repair my husband's sweater elbows.
Post a Comment